Keeping up with technology and using the latest and greatest doesn’t guarantee a good inspection any more than a brand new hunting rifle in the hands of a novice ensures a successful hunt. But advanced tools in the hands of already skilled inspectors can make the inspection even more detailed and detect potential defects that wouldn’t be noticeable otherwise.
One of the tools that has bolstered the home inspection industry, as well as other industries, is a thermal imaging camera. Thermal imaging has actually been around for a couple hundred years, but first took on prominence and was used by the British in anti-aircraft defense in the 1920’s after WW1. It started use in the United States soon after the US Military and Texas Instruments collaborated to create the first scanner in 1947. The technology began to gain popularity with the residential population toward the end of the 20th century, and today has progressed to the point that it is affordable for nearly everyone. How is this technology useful for inspections? And what does it check for?….. I’m glad you asked.
Home inspections, by most standards, are visual, non-invasive inspections. In other words, they don’t tear components apart to get a better view. Seeing through or behind walls is not something possible in a normal home inspection. However, with thermal imaging technology, finding certain defects inside walls or ceilings, or other concealed areas may be possible if the conditions are right.
While there are many things that thermal imaging can be used for in various industries, such as night vision, law enforcement, and security just to name a few, for home inspections it is primarily used for detecting moisture.
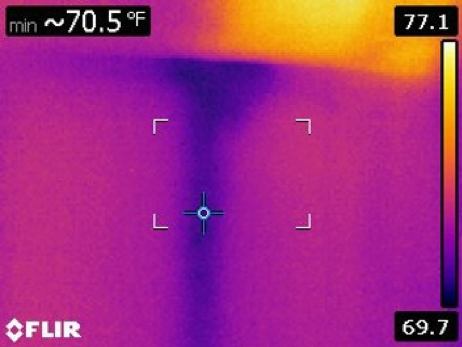
One important distinction that gets overlooked, it that a thermal camera is not a moisture detector. Instead, it is effective at detecting thermal anomalies. The difference in colors in a thermal image is due to recognizing and capturing infrared light. To the novice, the image of a cold area can look the same as a wet spot.
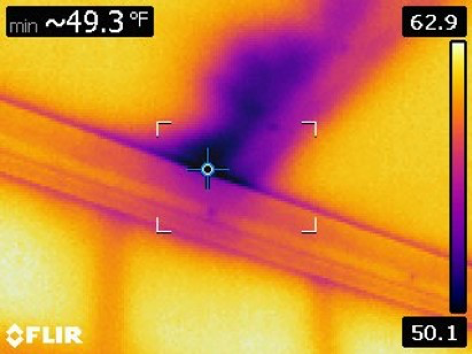
The photo on the left is the view of a wet spot on the ceiling of a sunroom. This indicates moisture entry either through a roof leak or ice dams. The photo on the right is cold air infiltration around a door due to missing insulation or sealant. Notice the colors look extremely similar. In order to be sure, the blue area need to have follow up analysis with a moisture meter. If a blue area is “dry”, then it can likely be confirmed to be just air infiltration and not an active leak or latent moisture.
Probably the most common application on our inspections is the following scenario: 1. Fill upstairs tubs, run showers, etc., 2. Drain the fixture. 3. Wait 10-15 minutes and use a thermal imaging camera to scan the area under the fixtures that were just operated and look for any thermal anomalies, and 4. If there are suspicious areas follow up with a moisture meter. If an area is confirmed for moisture, there is a leak somewhere related to the fixture. It could be from a sink, toilet, water line, shower, tub, drain, etc. We can detect the moisture, just not be completely sure what it is from. The reason we wait a few minutes before checking is that when moisture leaks out of pipe, through a wall, or into any concealed area, it initially assumes the temperature of the surrounding area. This does not show a thermal difference and doesn’t have much of a chance of being detected. However, when water begins to evaporate, it cools, and then has a greater chance of being thermally different than the area around it which makes it discoverable with this technology.
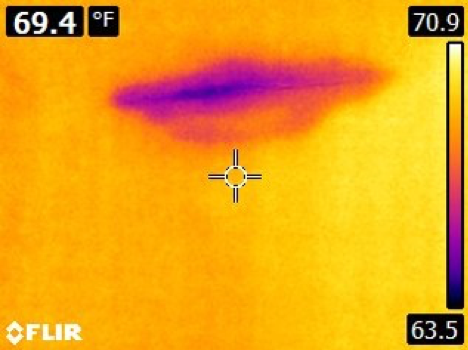
The photo on the left is from the exact scenario mentioned. This was under a tub and was actively leaking after draining the tub. The photo on the right is of a wall behind a chimney. I had a question about the poorly flashed chimney and discovered that it had leaked recently and had latent moisture in the wall. These areas were confirmed to be active leaks by a moisture detector.
The point in this is that none of these areas had visible stains on the drywall or paneling. Stains can be painted over or are not present to begin with and aren’t detectable during a home inspection. The thermal camera can detect these potentially deteriorating conditions before major damage is visible. Not only can this save the homebuyer from costly discovery later, the repairs that need done, in many cases can be done in a non-destructive manner.
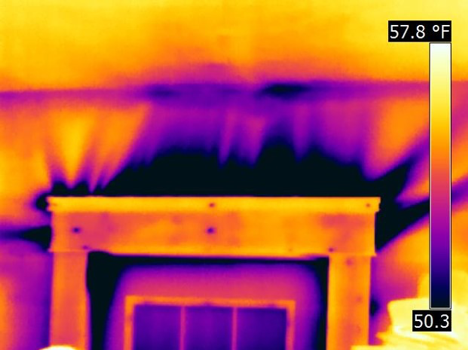
Another good use for these cameras is for detecting thermal defects in electrical panels. Some breakers, by design are warmer than others, but significant differences indicate loose connections, defective breakers, or other potential issues.
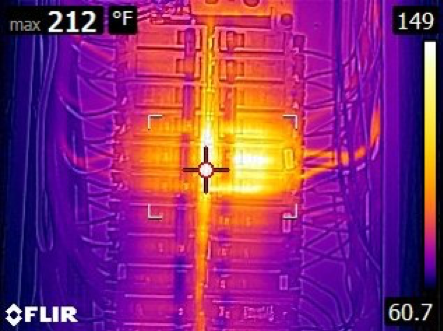
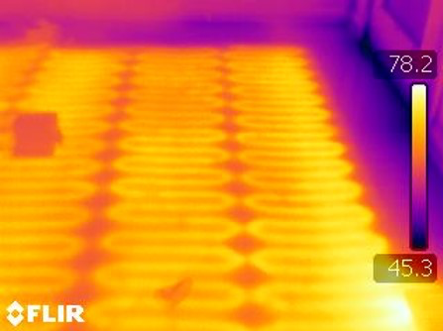
The photo on the left shows a temperature that is significantly higher than the range on the area shown at the right side of the photo. This indicates a problem that will need to be followed up and repaired by an electrician. This technology can also detect problems with switches, outlets, or fixtures. It also can confirm that something concealed is functioning properly. The image on the right is an electrical coil sub floor heat under tiles in a bathroom. The image confirms that all sections of the coil is heating properly.
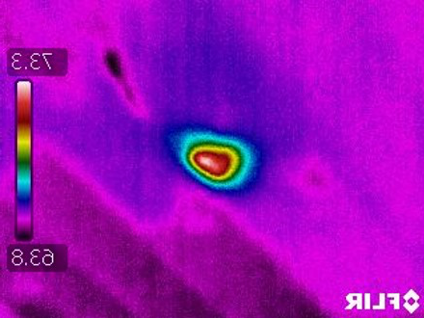
There are many other uses for it, some fun and some serious. But for home inspectors, it can be a valuable asset to help confirm moisture problems, detect ductwork problems, identify electrical issues, and look for the paranormal….just kidding on the last one, I think. Finally, here is another fun, but important find while being a detective with the camera. This little guy was stuck in a wall cavity in a nest and was fortunately detected in time to save it from dying inside the wall and creating a gigantic smell problem for the homeowner. This was detected due to the body heat from the raccoon, being different from the temperature of the surrounding area.